
This weekend has been about terrain building for 15mm WW2 games of Battlegroup.
I’m a big fan of the MDF model buildings explosion of the last few years. It’s opened up a dizzying choice for gamers where previously you had to rely on finding some resin diorama buildings, scale model railway options, or scratch build your own.
It some ways it’s more difficult to choose an MDF building as there are so many choices, particularly at 28mm. But choice is a good thing…isn’t it?
For 15mm WW2, and northern Europe in particular, I chose 4Grounds Europe at War collection (4Ground link). The buildings are reasonably straight forward to put together with PVA glue, have an amazing amount of detail and come pre-painted. And all the buildings can be put together with the floors and roofs detachable. Ideal for hiding your squads of troops or assaulting into buildings.
I do have to own up to not going the extra mile and finishing off the edges of the buildings, but that’s something I’ve promised myself I’ll go back and finish off, together with a bit more debris on the ruined buildings.
Cost conscious
Despite loving the 4Ground buildings, when it came to expanding my collection, I was looking for something that I could have more freedom to customise and make my own, and also that would be less expensive. In the years since first buying these products, the prices have understandably crept up.
So, off to the internet. I was looking for a church, the centrepiece for many a European village, and some other interesting objectives to fight over. And they had to be reasonably priced.
First stop, Hoka Hey Wargaming in the UK. They had a small Norman church in 15mm, 20mm and 28mm ! Over all sizes were supplied on the site, but I felt the 15mm version may be a little on the small side.
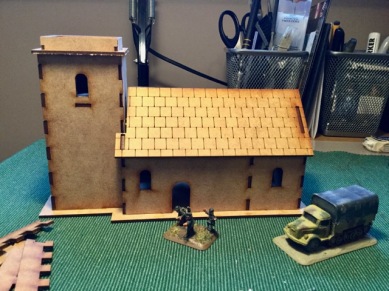
A quick email and the owner helpfully confirmed some sizes for me and agreed the 20mm version may be a better option. That advice proved to be spot on once it was built and some Battlefront models were standing beside it.
Hoka Key & Timeline Miniatures website
I then decided a new objective was required for the allies to aim for. I spotted a radar station at Sarissa Precision, another UK company doing many ranges of buildings at different scales.
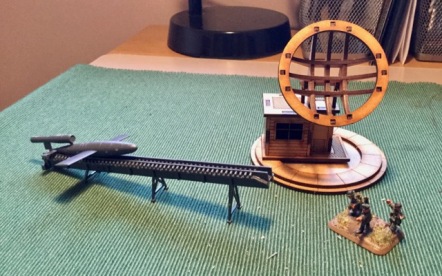
Like a lot of MDF kits, very easy to put together, and fantastic detail. Beside the radar station is a V1 bomb and launch track. These are from the Battlefront Flames of War Open Fire starter set. I managed to pick this up off eBay on its own for a couple of our British pounds.
Next on my shopping list was a barracks or storage facility to go with the V1 launch track.
This nissen hut came from The Seargents Mess, another small manufacturer in the UK with a great range of those small battlefield items that just add more detail and flavour to your tabletop.

The hut and scatter are all 20mm – the only scale The Sergeants Mess work with – however, I still think it’s a great fit for the Battlefront 15mm models.
I also have 15mm Peter Pig figures for WW2 and they also size well against it.
The church
While the hut, V1 track and radar station all just really required an undercoat and then a lick of paint, for the church I wanted to try and get a rough stone finish. Something from the Norman age was never going to have a smooth plastered finish to it !
To get the finish I was looking for, I found the remains of a can of spray that was used for a DIY project – PlastiKote stone spay paint. The colour is Gotham Grey, and it leaves a rough textured finish. I then used GW’s Agrax Earthshade wash to add some weathering.
As a primer for all the buildings I used Halfords grey (auto) primer. It’s inexpensive and easy to get hold of. It also leaves a nice smooth finish and the spray nozzle ensures an even coat. It is for car bodywork, so needs to leave a good finish.
It was then a case of adding some flock, painting the wooden doors brown, and done!

The finishing touches
The radar station was just washed with GW black over the grey primer, and the hut section painted using GW Kemri brown and again washed with Agrax Earthshade.
The nissan hut was painted with Vallejo German Cammo Dark Green with some highlights of Luftwaffe Cammo Green and GW Warpstone Glow.


All in, a successful weekend finishing these models off. I’ve also made a start on some scratch built terrain – hedges and barbed wire obstacles. Maybe they’ll make next week’s post.

The texture on the church really brings that to life. For my roofs, I cut out strips of thin card stock, cut out little bits along the strip to simulate tiles, and then layer the strips from top to bottom. The effect is pretty stellar. Here’s an old BGG pic of one of my buildings on the Rapid Fire page, if you’re interested: https://boardgamegeek.com/image/346623/rapid-fire-second-edition?size=original
LikeLiked by 1 person
Thanks for the kind comments. I’ll have a look. Good to see other ideas for making MDF kits unique.
LikeLike
Your website has proven useful to me.
LikeLiked by 1 person